TESTIMONIALS
I had excellent technical service experience with the crew at Tasty Apps. In this modern age, it can very hard to get quality service, especially on a technical level. These guys really knew their stuff and were so detailed in their advice, that it actually restored my troubled Mac Pro back to peak performance. Very, very impressed. Tasty Apps sets a standard of service that the whole country can and should follow as an example. — Sean Davey, http://seandavey.com
(...) diligent, tenacious and relentless product support (...) — Danny McCall, http://www.talentsphere.com
A ground-breaking & revolutionary array of software for Mac, Tasty-Apps' products and further tech support is so reliable - I would thoroughly recommend them to anyone. — Ryan
I've been using TastyApps' products (Videobox, Musicbox, Web Snapper, and FlagIt!) since 2009. I'm a huge fan of their products, and have also become a huge fan of their Technical Support. As a Macintosh Consultant and Software Instructor, this is not a phrase I often have the opportunity to say, and in the case of TastyApps, I'm more than pleased to be able to say it. (...) I can't say enough good things about TastyApps' Support Services. I heartily recommend their software, their company, and their Tech Support. — Stephanie Gans, http://www.aym4training.com
I didn’t use my copy of VideoBox much UNTIL I discovered that it can convert Elgato EyeTV MPEG2 files (QuickTime Pro cannot). If ever Easy VHS to DVD crashes while converting a recording (It records in MPEG2 format) – the ONLY App I have that CAN convert the leftover MPEG2 files to QuickTime MOV is VideoBox. So, Instead of paying Apple $20 for a Quick time MPEG2 Converting Plugin: I recommend you Buy VideoBox for $15 to do the Exact same Job! — Carl McCall, http://softwaresanta.com/
(...) the renew license was very easy to use and in minutes my VideoBox was working. In a time where support for most companies really sucks—I appreciate your quick and thorough turnaround to my issue—thanks for the support. — Scott Medina, http://www.isminc.com
POSTED ON
December 18, 2018
AUTHOR
Tom
CATEGORY
VideoboxPro
Featured Apps
Bundled Apps
Tutorials
OVERVIEW
VideoboxPro allows you to quickly and easily download Flash video
from most of the popular video sites on the Internet; and it comes with a Password Manager for source sites that require a logon.
VideoboxPro can convert videos into the Quicktime format for viewing on your Mac, iPod, iPhone or in iTunes.
VideoboxPro can also convert files to other popular video file formats – mpeg, mov, 3g2, mp4, wmv, flv, avi & webm. And, when available,
VideoboxPro can also capture English sub-titles from YouTube videos.
VideoboxPro can capture just the audio from videos and save it in popular audio file formats - mp3, m4a, wav, or ogg and you can
choose to automatically import your downloaded video and audio files to iTunes
VideoboxPro installs with preset default settings in the "Beginner" Level that allows new users to start using VideoboxPro
immediately with good results. VideoboxPro users can step up through four user Levels - Beginner, Intermediate, Advanced, and Expert -
each providing additional video formatting options.
INSTALL
Installation is easy. After downloading VideoboxPro just click on the videboxpro.dmg file in your downloads folder to launch the
VideoboxPro installer. Then, on the VideoboxPro Installation screen, drag the VideoboxPro icon on the left and drop it onto the
Applications folder icon on the right of the Installation screen and you are done.

On some systems you might need to click on the VideoboxPro virtual disk the dmg file will put on your Desktop to launch the VideoboxPro
installer. When done you can right click the VideoboxPro virtual disk icon on your desktop and select “Eject” or just drag it to your
Trash Bin to eject it.
SETUP
No initial Setup required to start using VideoboxPro in the "Beginner" user Level. To change user Levels see the
"Setting Your Default Preferences" section below.
INTERFACE
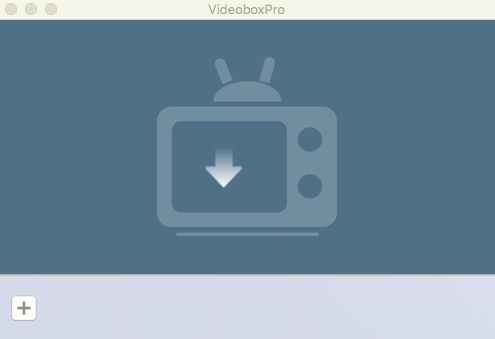
VideoboxPro launches with an animated TV set icon in the Drop Zone and a single  button.
The VideoboxPro Drop Zone can be used for manual Drag N Drop captures of local audio/video URLs. See the “Manual Drag N Drop”
section below. It is also used for converting video and audio files you already have. See the “Converting Existing Video or Audio Files”
section below for details.
button.
The VideoboxPro Drop Zone can be used for manual Drag N Drop captures of local audio/video URLs. See the “Manual Drag N Drop”
section below. It is also used for converting video and audio files you already have. See the “Converting Existing Video or Audio Files”
section below for details.
OPERATION
Captures are easy with VideoboxPro. For OS X 10.12 and above, VideoboxPro includes a Safari Extension.
Safari Extension Installation
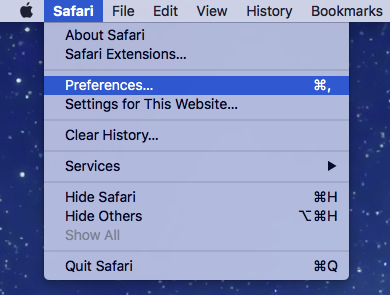
With Safari closed, launch VideoboxPro, then launch Safari and open Safari Preferences from the Safari menu.
From the Safari Preferences screen select the "Extensions" Tab.
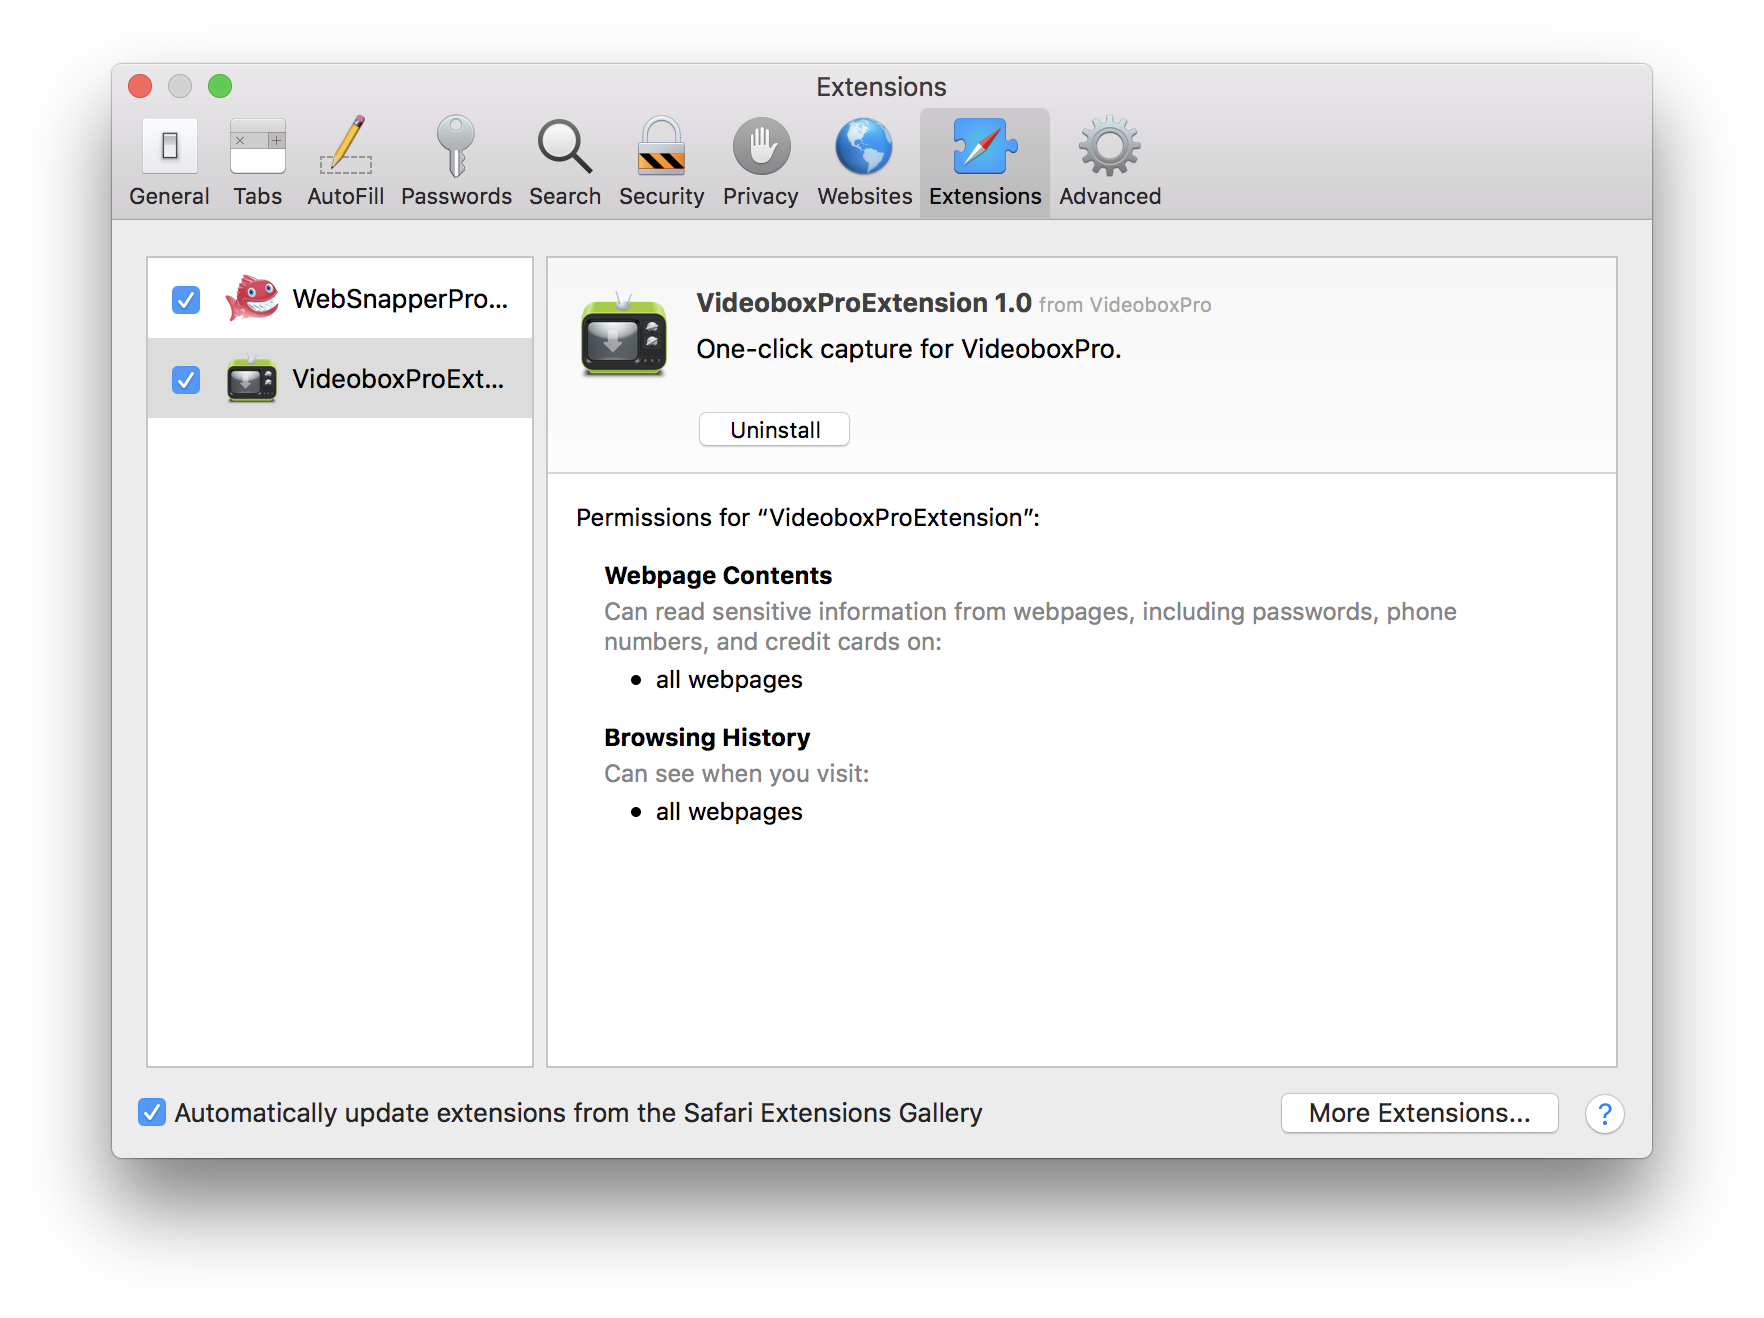
Make sure the checkbox for VideoboxPro in the left column is checked. Quit and relaunch Safari and the Videobox Extension
![]() will be added to your toolbar.
will be added to your toolbar.

With a video URL active in Safari, just click the VideoboxPro Extension on the Safari toolbar to launch VideoboxPro and add the target
page to the downloads queue. If VideoboxPro is already open, the Extension will just add the target to the queue. You can continue adding
target pages with the Extension.
When using Safari or Chrome you can also just click the button in
the VideoboxPro Interface and choose the browser with your target and it will be added to the VideoboxPro Download queue for
processing. And in Preferences you can assign the "Add" button function to Safari or Chrome. Once assigned the "+" button will be
replaced by the assigned browser icon.

You can also paste a URL, or a list of URLs, or RTF, HTML, or plain text with URLs, from your Pasteboard or use the
Shift–Command–V keyboard shortcut to add the URLs on your Pasteboard to the VideoboxPro queue.
Shift–Command–S will add the current Safari URL to the Downloads queue.
Shift–Command–C will add the current Chrome URL to the Downloads queue.
Bookmarklet
If you are not using Safari or Chrome you can use the available Bookmarklet to capture videos. The Bookmarklet works in all browsers.
Just drag this button
VideoboxPro
and drop it onto the bookmarks bar in your browser, The Bookmarklet will appear on your browser bookmarks bar.
With a video URL in your browser just click the VideoboxPro Bookmarklet on your browser bookmarks bar and VideoboxPro will
add the video to the downloads queue for processing. If VideoboxPro is not already opened when you click the Bookmarklet, the Bookmarklet
will open VideoboxPro and add the target page to the Downloads Queue for processing. With VideoboxPro open, the Bookmarklet can provide the
same 1-click functionality of the "Add" button.
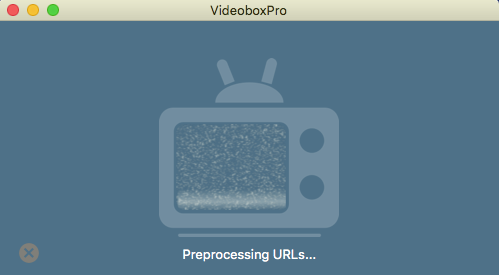
While the selected video is being preprocessed for downloading you can continue to add videos to the queue.
You can also cancel the videos being preprocessed for downloading using the "X" button in the lower left corner of the Drop Zone.
In the Interface example below, three videos have been added to the downloads queue. You can process all the videos in the download
queue with a single click of the “Process all” option available in the Batch options . The videos will be downloaded and processed
using the default settings in VideoboxPro Preferences. See "Setting Your Default
Preferences" section below. You can also “Clear completed” or “Clear all” videos in the queue.

During the downloading/Conversion phase of Processing the down arrow in the center of the video image will be replaced with an “X” that
you can click to cancel the process. Cancelled (or completed) targets will have a curved arrow icon that can be used to restart the
process.
Sometimes the “one size fits all” approach might not be best. By default, VideoboxPro will download videos with a resolution up to
720p. But you might not want the default resolution on a particular video, or you might want to use a different output format on a
particular video. And for YouTube videos in Full HD 1080p, you must set the “Output for:" option to "Mac Viewing (Full HD if possible)"
or, in High Sierra, "Mac Viewing (High Sierra, Full HD if possible)". For Youtube 4k videos you must set the "Output for:" option to
"Mac Viewing (Ultra HD if possible)"
And, since the conversion process can be a lengthy procedure, if file type conversion is not necessary, you might want to use the
“Download only (no conversion)” option on individual files.
VideoboxPro makes it easy to handle these situations. You can process the videos in the downloads queue individually using the
down arrow in the center of the target image in the queue. You can also remove selected videos individually from the queue using
the Trash Can icon just below the video URL in queue.
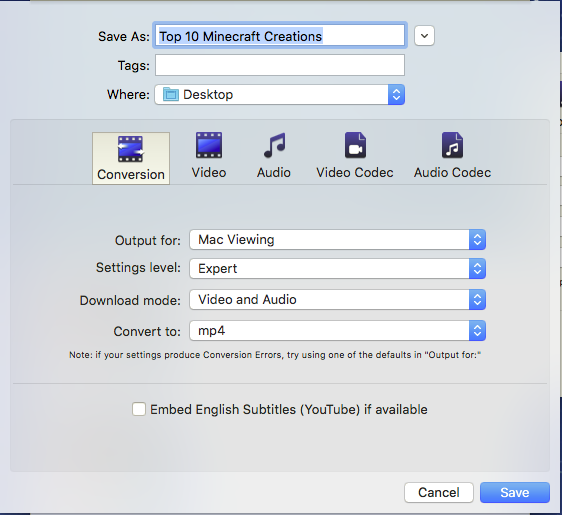
When you download videos individually you will get a one-time Preference screen where you can set all the video conversion options
and the destination, for that individual video.
NOTE: To have full control of individual Download/Conversion options make sure the "Start downloading automatically with
default settings" option in the Preferences General tab is NOT enabled. If that option is enabled you will not get the
one-time Preferences screen, and clicking the individual Download button will automatically download and convert the video using your
default Preference
settings.
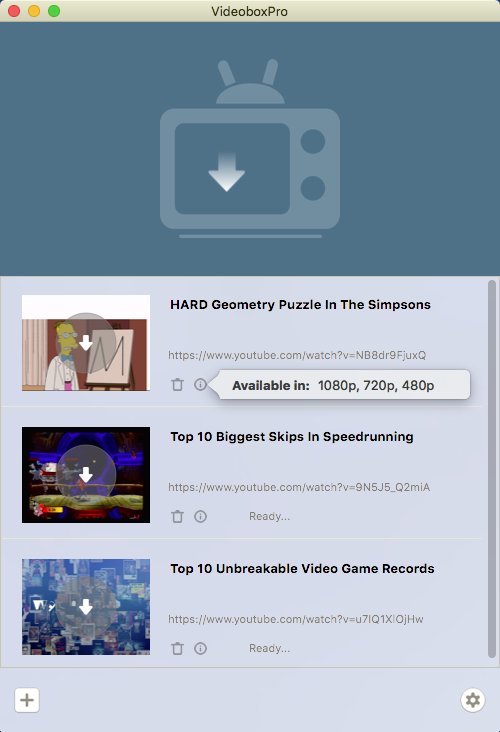
The information icon  below each video in the queue shows available video info. Different
source sites provide different information. You can use that information to decide if you want to process the videos individually with
special output settings.
below each video in the queue shows available video info. Different
source sites provide different information. You can use that information to decide if you want to process the videos individually with
special output settings.
Processing
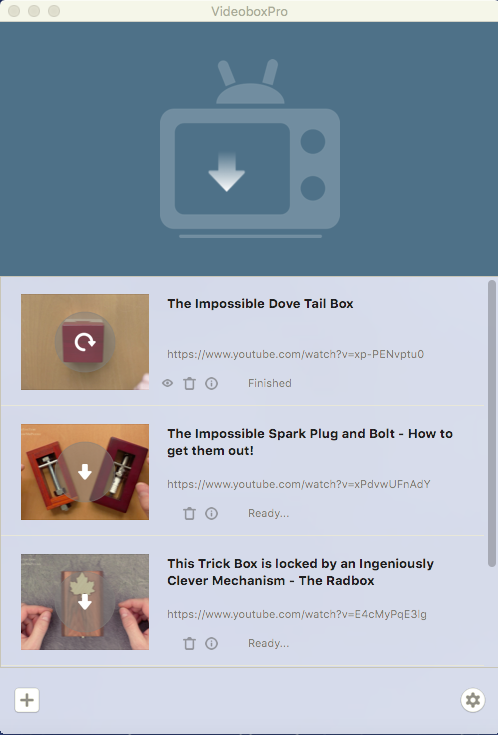
In the example above, the first video has been processed individually and a "Locate"  button is now available that will show where the processed file has been saved on your Mac.
You could now use the Trash button  to remove the video from the queue and process
the remaining videos using the "Process All" batch button that will use your normal default settings. Or you can process more videos
in the queue individually.
to remove the video from the queue and process
the remaining videos using the "Process All" batch button that will use your normal default settings. Or you can process more videos
in the queue individually.
Setting Your Default Preferences
VideoboxPro installs in the “Beginner” Level. To set up or change your default Preferences for VideoboxPro, launch VideoboxPro and
open the VideoboxPro menu by clicking on “VideoboxPro” in your Mac toolbar. Select “Preferences…” from the VideoboxPro dropdown menu.
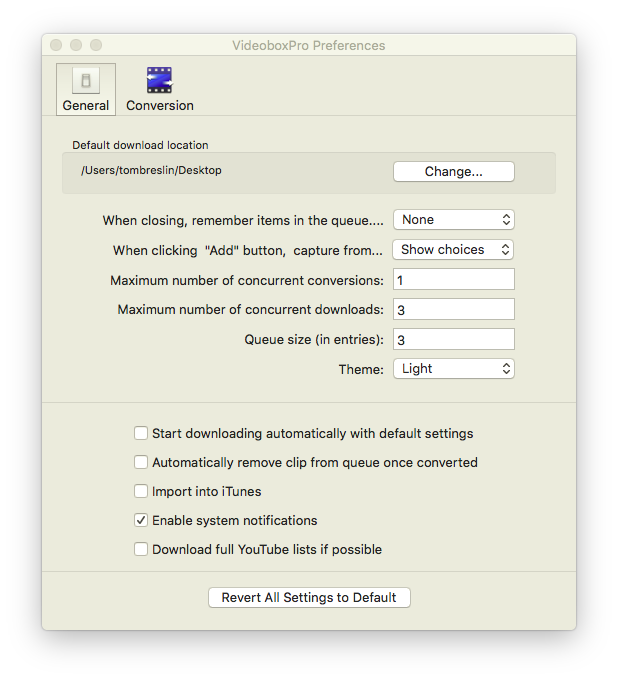
There are two Tabs available in this initial Beginner Level VideoboxPro Preference screen, “General” and “Conversion”. The "General"
tab will be active and it is where you can set your default download location, just click the “Change…” button and select a new
location
When closing, remember items in the queue...
You can set VideooxPro to remember All items in the queue, Unprocessed items. or None when VideoboxPro is closed.
Default is "None".
When clicking "Add" button, capture from...
Sets action of the ![]() button.
Options are "Show Choices", "Safari", or "Chrome". Select Safari or Chrome for 1-click operation. The "Show Choices" option will allow source
changes on the fly. Note: If Safari or Chrome are selected the
button.
Options are "Show Choices", "Safari", or "Chrome". Select Safari or Chrome for 1-click operation. The "Show Choices" option will allow source
changes on the fly. Note: If Safari or Chrome are selected the ![]() icon will be replaced by the selected browser icon.
icon will be replaced by the selected browser icon.
You can set the “Maximum Number of Concurrent Downloads:” and
"Maximum Number of Concurrent Conversions:" (used when doing ‘batch’ Download/Conversions of all the files in your Downloads
queue) to limit CPU usage.
The "Queue size" limits the expansion of the downloads screen before a scroll bar appears.
You can set the “Theme:” of the VideoboxPro display. The Light Theme is the default and is used here on the Tutorial images. The
Dark mode is visually striking on screen.
The "Start downloading automatically with default settings" is not enabled by default. This
will allow you to set one-time settings for individual downloads. Note: If you enable this
option, you won't be able to set options "on the fly" for individual videos, and your default settings will be used to automatically
download and convert the selected video.
You can Automatically Remove Clip from Queue Once Converted and you can have the captured video
or audio files automatically Import into iTunes
The "Enable system notifications" option is enabled by default and allows a brief visual and audio confirmation of download
completions at the upper right corner of the Desktop.
The "Download full YouTube lists if possible" option is disabled by default. When enabled it allows VideoboxPro to add all videos in a
YouTube "Mix" list.
The “Revert All Settings To Default” button is a master reset button for both the
General tab settings and the Conversion tab settings. All settings on both tabs will be reset.
Conversion Tab: Initial (Beginner) Screen
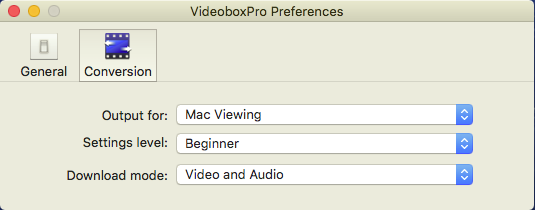
The Conversion screen in the Beginner Level provides just 3 settings.
The "Output for:" setting is used to choose preset format settings for different viewing
devices. There are many to choose from. And please note, by default, all High Sierra settings use the H265 codec.
The "Download Mode:" setting allows you to download the complete video and audio, just the
video, or just the audio.
The initial settings for each "Output for:" choice have been optimized for most users and should give satisfactory results for
your intended use. You cannot change the settings at the "Beginner" Level.
As you move up User Levels using the "Settings Level:" , you will see more available options
and you will able to change the initial settings. Any changes you make will remain in effect until you change them or you can go
back to the original factory settings anytime by using the “Revert All Settings to Default” button on the “General” screen.
Conversion Tab: Intermediate Screen
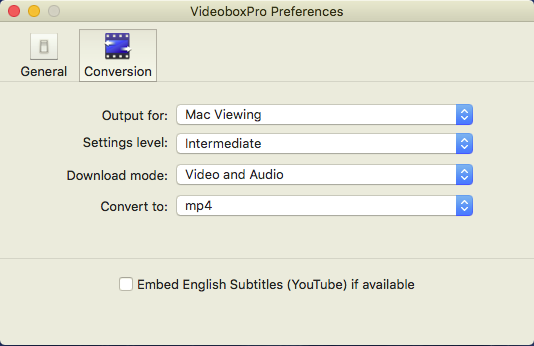
The Intermediate Level adds the capability to change the factory default "Convert to:"
output format to one of the following: mp4, mov, mpeg, avi, flv, wmv, 3g2, webm or Download only (no conversion).
Also added is the option to "Embed English Subtitles (YouTube) if available".
If English Subtitles are available with a YouTube video, enabling this option will add the Subtitles to the video.
Note: Subtitles will not work for some formats. "English (auto-generated)" subtitles are not downloaded.
Conversion Tab: Advanced Screen
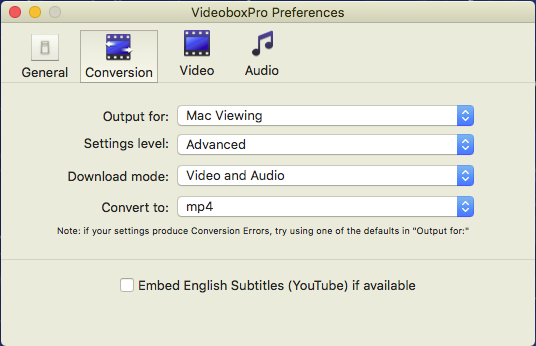
The Advanced Level, intended for experienced users, adds the ability to adjust the size (Height and Width) of the video and offers
advanced audio settings.

The presets provide the optimal video resolution for most platforms, but if you wish to change the resolution be aware that
increasing the size above the actual size of the target video will degrade the quality. The "Size (px)" option in the Video section
of the Advanced screen allows you to change the size, however if proportions are not matched there will be distortion. You can check
the “Keep aspect ratio” option and VideoboxPro will auto-detect the video size and maintain the correct proportion.
If the "Use as maximum resolution" is checked, a target video larger than the "Size (px)" setting will be downsized.
If the target video has a smaller resolution than the "Size (px)" setting, the original size will be maintained.
If the "Use as maximum resolution is not checked, target videos with smaller resolutions than the "Size (px)" setting
will be upscaled and those with larger resolutions will be downsized to the "Size (px)" setting.
The "Use downloaded file settings" for the "Size (px)" will keep the target video's size setting, maintaining size, and proportion.
The "Use downloaded file settings" for the "Codec" will keep the target video's codec.
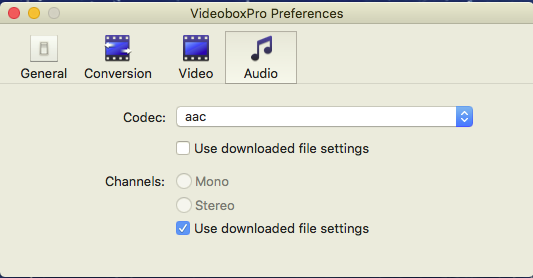
The Audio section of the Advanced screen allows you to choose the audio codec, and whether you want Mono or Stereo output.
As with the video settings, you can choose "Use downloaded file settings" to maintain the files audio settings.
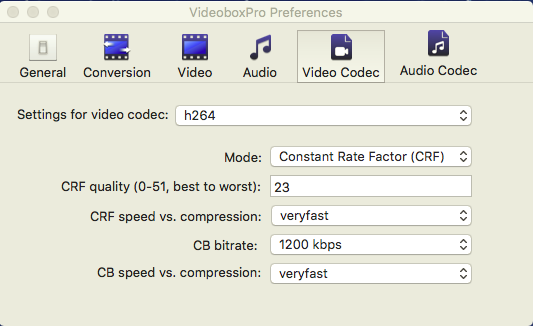
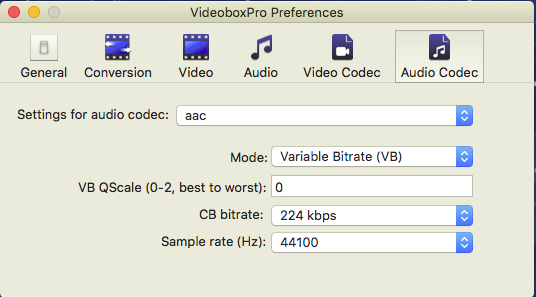
Conversion Tab: Expert Screen
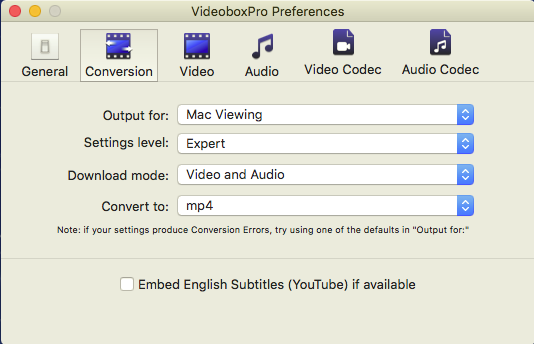
The Expert Level adds Video and Audio Codec control and is intended for the professional user. Incompatible and/or conflicting
settings can cause video and audio distortion and conversion falures.
Password Manager
Some video source sites require a logon and password to view videos. VideoboxPro includes a Password Manager that can help with that.
You can access the Password Manager through the VideoboxPro menu.
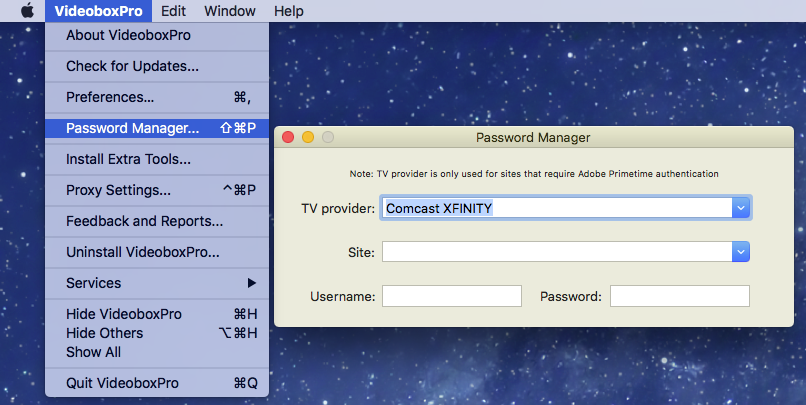
Pick a site from the Site box and then add your "Username:" and "Password" for that site. VideoboxPro will
remember your logon info for that site.
CableTV providers sometimes offer a website to their subscribers to view content over the Internet. Just pick your supported
TV provider and enter your Cable Username and Password.
Notes:
- If you Login to a YouTube/Google site you may get an email "Security Alert" about "...a new Linux device" logged onto your account. This is normal. You can follow the link in the email to confirm it was a legitimate logon and that should stop future alert emails when you logon through VideoboxPro.
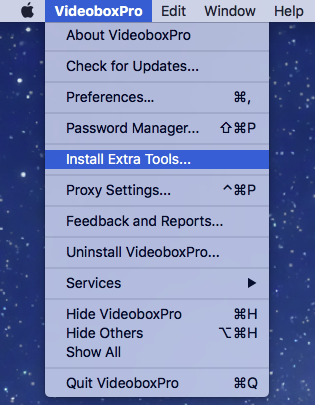
- Some sites provide encrypted videos and VideoboxPro has “Extra Tools” to help with this. We recommend you install “Extra Tools” from the VideoboxPro menu to handle encrypted videos automatically.
- Some sites use CloudFlare protection to make video files "invisible" to applications. You can identify a CloudFlare protected site
if you see a notice that your browser is being checked to access the site.
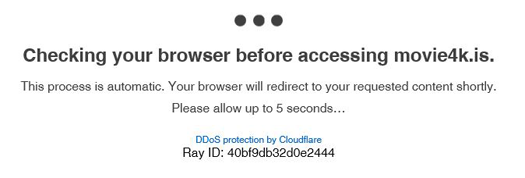
With VideoboxPro, you can bypass CloudFlare protection to "see" videos by using the "URL from Chrome" or the "URL from Safari" capture options. You cannot use the "Paste URL" option or the Bookmarklet, or the manual Drag N Drop to the Drop Zone for these sites.
Please Note, when using the "URL from Safari" option or the "URL from Chrome option, you must allow JavaScript from Apple Events. In Safari open Preferences and on the Advanced tab, click the "Show Develop menu in menu bar" box at the bottom of the window.
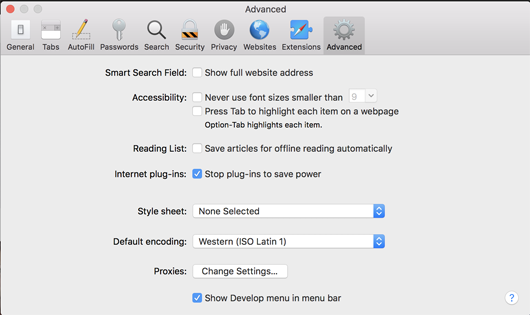
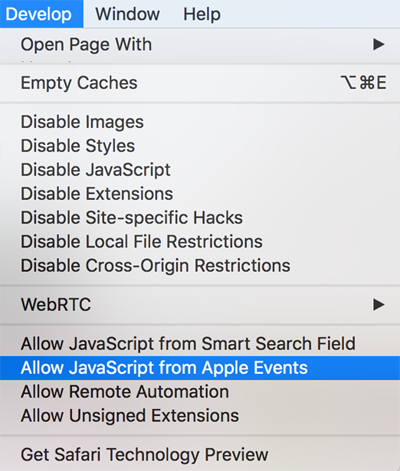
This will put a "Develop" menu option on the Safari toolbar. Open the "Develop" menu and select "Allow JavaScript from Apple Events". Confirm and enter a password if required.
Please Note: On some systems the "Allow JavaScript from Apple Events" may not work. This is a known Apple bug and we are trying to find a work-around.
To allow JavaScript in Chrome, open Chrome
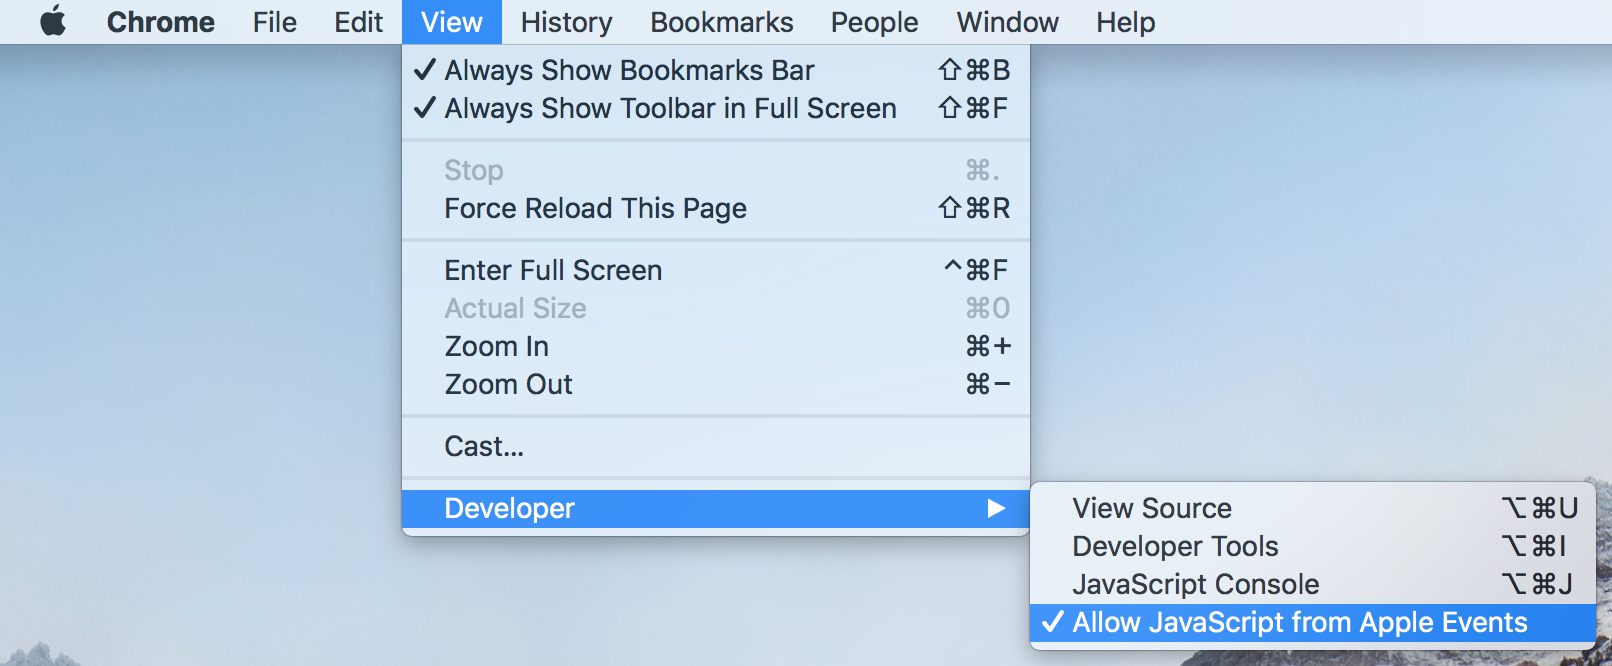
Select "View" from the Chrome toolbar, then "Developer", and select "Allow JavaScript from Apple Events".
Proxy settings...
Some sites are ‘georestricted’, restricting viewers from certain areas or particular sites or content from certain sources.
VideoboxPro offers “Proxy settings…” to help with that.
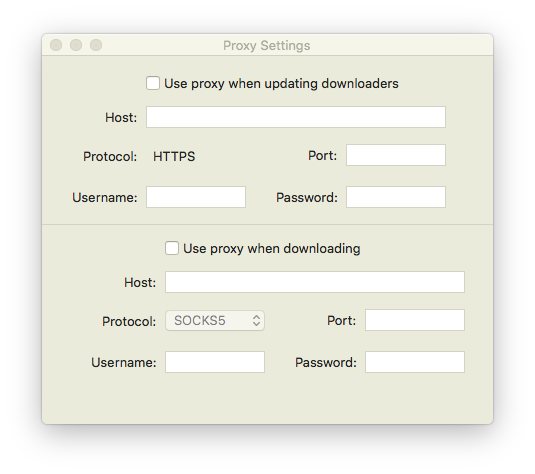
You must have a Proxy account at a Proxy Services provider. A proxy server is a server that acts as an intermediary for requests
seeking resources from other servers.
Both the top and bottom sections are used when you are accessing the internet through a proxy. Keep in mind the top section requires and HTTPS proxy.
The bottom section of the Proxy Settings screen - "Use proxy when downloading" - can be used alone for sites that are georestricted.
Manual Drag N Drop
Please Note: The manual Drag N Drop is not recommended for captures from the internet. The Safari Extension, Bookmarklet
and internal Safari and Chrome buttons are more reliable. With a local video URL in your browser address box, just click and drag
the URL in your browser address box and drag and drop it onto the Drop Zone on the VideoboxPro interface screen. If VideoboxPro
is not open you can drop the URL onto the VideoboxPro icon on your Dock to open VideoboxPro and add the video to the queue.
Converting Existing Videos
VideoboxPro is not just for capturing videos or audios from the Internet. If you have existing media files and want to convert them
to different formats or sizes, VideoboxPro can do that for you. Just drag and drop your media files onto the Drop Zone to add them
to the queue for processing, just like a downloaded file. If VideoboxPro is not open just drop the file onto the VideoboxPro
icon on your Dock to open VideoboxPro and the file will be added to the queue. You can even drop a folder onto the Drop Zone and
VideoboxPro will recognize all video and audio files and add them to the download queue. All the same controls apply, you can
‘batch’ convert the files using the “Process All” option or you can process the files individually.
Developer Notes:
The Install Extra Tools option will move a precompiled "pycrypto" library to your /Library/Python/2.7/site-packages/ if it does not
exist (version 2.7a1). It will also add /usr/local/lib/gcc/7/libgcc_s.1.dylib if it does not exist.
If you are using a python version other than 2.7, then you will need to install pycrypto yourself.
VideoboxPro can support some sites that use RTMP. However, you will need to install "rtmpdump" first. The easiest way to do that is
to install "homebrew" (https://brew.sh) and then run "brew install rtmpdump". VideoboxPro will pick it up and start using it when
necessary.