TESTIMONIALS
I had excellent technical service experience with the crew at Tasty Apps. In this modern age, it can very hard to get quality service, especially on a technical level. These guys really knew their stuff and were so detailed in their advice, that it actually restored my troubled Mac Pro back to peak performance. Very, very impressed. Tasty Apps sets a standard of service that the whole country can and should follow as an example. — Sean Davey, http://seandavey.com
(...) diligent, tenacious and relentless product support (...) — Danny McCall, http://www.talentsphere.com
A ground-breaking & revolutionary array of software for Mac, Tasty-Apps' products and further tech support is so reliable - I would thoroughly recommend them to anyone. — Ryan
I've been using TastyApps' products (Videobox, Musicbox, Web Snapper, and FlagIt!) since 2009. I'm a huge fan of their products, and have also become a huge fan of their Technical Support. As a Macintosh Consultant and Software Instructor, this is not a phrase I often have the opportunity to say, and in the case of TastyApps, I'm more than pleased to be able to say it. (...) I can't say enough good things about TastyApps' Support Services. I heartily recommend their software, their company, and their Tech Support. — Stephanie Gans, http://www.aym4training.com
I didn’t use my copy of VideoBox much UNTIL I discovered that it can convert Elgato EyeTV MPEG2 files (QuickTime Pro cannot). If ever Easy VHS to DVD crashes while converting a recording (It records in MPEG2 format) – the ONLY App I have that CAN convert the leftover MPEG2 files to QuickTime MOV is VideoBox. So, Instead of paying Apple $20 for a Quick time MPEG2 Converting Plugin: I recommend you Buy VideoBox for $15 to do the Exact same Job! — Carl McCall, http://softwaresanta.com/
(...) the renew license was very easy to use and in minutes my VideoBox was working. In a time where support for most companies really sucks—I appreciate your quick and thorough turnaround to my issue—thanks for the support. — Scott Medina, http://www.isminc.com
POSTED ON
June 20, 2017
AUTHOR
Tom
CATEGORY
Web Snapper
Featured Apps
Bundled Apps
Tutorials
OVERVIEW
Web Snapper allows you to capture full web pages from your web browser
with a single mouse click without the need to “stitch” or cut and paste individual screenshots.
You can save the page capture as an image file – most popular types supported – or as a vector based PDF file. You can also print
the captured page, send it as an email attachment, or send it to Evernote (if installed) right from the Web Snapper interface.
After you install Web Snapper be sure to install the Web Snapper Bookmarklet in your browser. Just drag this button
Web Snapper
and drop it onto the bookmarks bar in your browser, The Bookmarklet will appear on your browser bookmarks bar.
When viewing a web site in your browser just click the Web Snapper Bookmarklet on your browser bookmarks bar and Web Snapper will
capture the current page. If Web Snapper is not already opened when you click the Bookmarklet, the Bookmarklet will open Web
Snapper and add the target page to the Downloads Queue for processing.
INSTALL
Installation is easy. After downloading Web Snapper just click on the websnapper.dmg file in your downloads folder to launch the
Web Snapper installer. On the Web Snapper installation screen drag the Web Snapper icon and drop it onto the Applications folder
icon on the installation screen and you are done. On some systems the .dmg file might put a virtual disk on your desktop named
Web Snapper. Click on the virtual disk to launch the Web Snapper installer. When done you can right click the virtual Web Snapper
disk icon on your desktop and select “Eject” or just drag it to your Trash Bin to eject it. Don't foget to install the Web Snapper
Bookmarklet...it makes captures a 1-click operation.
SETUP
To set up the default Preferences for Web Snapper, launch Web Snapper and open the Web Snapper menu by clicking on “Web Snapper”
in your Mac toolbar.
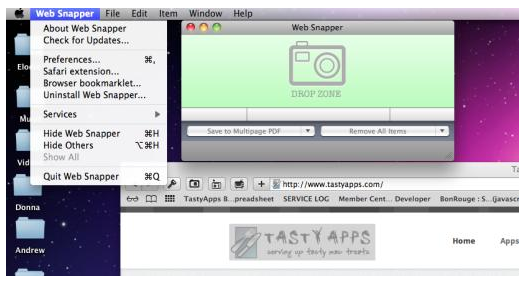
Select “Preferences…” from the Web Snapper dropdown menu.
Preferences Download Screen
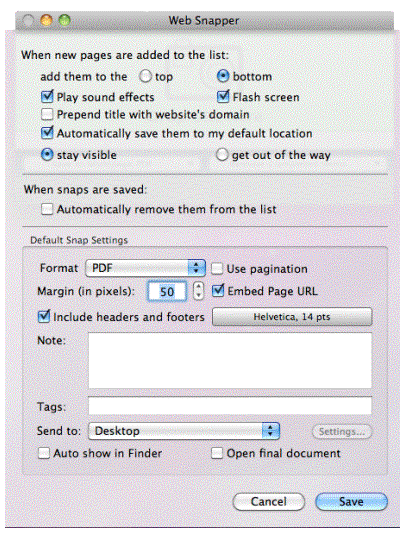
The top section lets you set how you want Web Snapper to work. Here is what each option does:
When new pages are added to the list:
You can add them to the top or bottom of the list in the Web Snapper Downloads.
Play sound effects - Audio cue when snapping.
Flash
screen - Visual cue when snapping.
Prepend title with website's domain
Adds source domain to file name of snap.
Automatically save them to my default location
Saves each capture immediately to the "Send to: location in the Default Output Settings below.
Stay visible or Get out of the way. Keeps the Web
Snapper
interface visible on screen after snaps, or minimized "...out of the way." Note: if "Automatically save to default location" is
also
enabled with the "Get out of the way" option, Web Snapper will close after each snap and the Downloads queue will be deleted.
When snaps are saved:
Whether automatically or manually saved,
they can also be automatically removed from the Downloads Queue.
Format: Select the output format for your snap. You can chose BMP, GIF, JP2, JPEG, PNG,
TIFF, & PDF.
Use pagination: Only available with PDF format - used to insert page breaks in long
(physical length)
PDF's for printing.
Compress: Only available with JPEG forma - used to set compression.
Margin (in pixels): Sets margins for printing.
Embed Page URL: Makes source URL available to Spotlight.
Include headers and footers: The "header" is the "Title" (if defined in the page HTML) at
the top left, with the Date and Time at the top right. The "footer" is the page URL at the bottom left with the page number at
the bottom right.
Note: A note or identification that will be inserted above the footer.
You can set the Font Face, and Size for the header, footer, and Note using the font button.
Tags: Includes OpenMeta tags in the document. OpenMeta tags are a cool way of organzing
your
documents and interfacing with other applications. You can learn more at: https://code.google.com/openmeta/wiki/OpenMetaApplications
Send to: Options include, Desktop, Documents, Choose folder..., Printer, Email, Evernote
(if intalled).
Auto show in Finder/Open final document If one/both of the options are checked, AND
"Automatically save them to my default location" is also checked, Web Snapper will automatically take the snap, then either show
its location in a Finder window, or open the final document (PDF, PNG...) or both.
INTERFACE
The two "Batch" buttons at the bottom of the Web Snapper interface can be customized for quick capture tasks. The options for
both buttons are the same: Save All Items, Save to Multipage PDF, Email Multipage PDF, Remove Completed Items, Remove All Items.

The green “Drop Zone” is used for the manual Drag N Drop capture method when not using the Web Snapper Bookmarklet. More details
about Drag N Drop below.
OPERATION
Captures are easy with the Web Snapper Bookmarklet – when you want to capture a page you are viewing in your browser just click
the Web Snapper Bookmarklet on your browser bookmarks bar. If Web Snapper is not opened, clicking the Web Snapper Bookmarklet will
launch Web Snapper. If the "Automatically save them to my default location" has been enabled in Web Snapper Preferences, the page
will be captured in the Preferences selected Format and sent to the Preferences selected default "Send to"
location.
If the "Automatically save..." is not enabled, the snap is just added to the Web Snapper Downloads Queue for processing.

In the example above three pages have been added to the downloads queue. You can process all the pages in the download queue with
a single click on one of the “Batch” buttons at the bottom of the interface.
Or you can use the buttons just to the right of each item to process the items individually: Email, Download, Remove, or get Info.
As long as the “Automatically remove them from the list” is not enabled, your snaps will be available for additional processing
until Web Snapper is closed. Closing Web Snapper will clear the downloads queue.
Be aware that the PDF format was designed for printed media and, when printing, long web pages will be reduced to fit on a single
sheet of paper. The result can be a narrow image – the longer the web page, the narrower the image. When viewing on a browser or
viewer you can just magnify the image, but long PDF images are often unsuitable for printing. If you might want to eventually
print your PDF captures you can enable “Pagination” in Web Snapper Preferences. That will insert page breaks (8.5 X 11) into the
PDF document.
Don’t confuse the “Pagination” option with the “Save to Multipage PDF” Batch button on the Web Snapper interface. That button is
used to save multiple page site captures in the Downloads queue to a single multi-page PDF document – 1 web page to a page. Keep
in mind though that if any of the web pages are very long they will be reduced in size to fit on a single page. To use “Save to
Multipage PDF” the “When snaps are saved: Automatically remove them from the list” option” in Web Snapper Preferences must be
disabled to allow the web pages to be added to the Web Snapper downloads queue.
One last thing, long web page PDF captures that display fine in Preview (after zooming in) might display as a blank in Adobe
Reader, unless Adobe has fixed things recently. We believe this limitation – probably not intended – is just a holdover that
reflects PDF’s original design for printed material. Web pages were not around when Adobe developed the PDF format and page length
was limited by available paper sizes.
Manual Drag N Drop
If you haven't installed the Web Snapper Bookmarklet in your browser you can use the manual Drag N Drop method. When viewing a
page in your browser, just click and drag the little ‘favicon’ just to the left of the URL in your browser address bar and drop
it onto the green Drop Zone on the Web Snapper interface screen. If Web Snapper is not open you can drop the ‘favicon’ onto the
Web Snapper icon on your Dock to open Web Snapper and add the page to the queue.
Please Note:
When Web Snapper is called to make a capture it actually uses an internal mini-browser behind the scene, using the URL in your
browser address box. Sometimes, with dynamic content, all the info has not finished downloading when the mini-browser makes the
capture and you can end up with blank or incomplete pages. And with pages behind a logon screen, the URL in your browser address
box may not change and the mini-browser will just capture the logon page. One other situation - the size of the mini-browser
window (behind the scene) can trigger the responsive design techniques used to ensure layout compatibility for mobile devices and
the result may be pages that do not look like the display shown in your main browser -usually images are removed. The more
powerful Extension, before Safari 10.0.2 rendered it incompatible, took care of all this automatically.
So, in case you come across a page that doesn’t look quite the way you expected when using the Bookmarklet, here is a work-around
for those situations. In Web Snapper Preferences disable the “Automatically save them to my default location” option. Now the
Bookmarklet for Web Snapper will just add the target page to the downloads queue. In the downloads queue, notice the blue link
just below the Title…click on the link to force the target page on screen in the mini-browser, navigate past any log on screen in
the mini-browser if necessary, wait until all dynamic content has loaded, and ensure the mini-browser horizontal size is large
enough to display the full horizontal content and then use the Capture button in the mini-browser toolbar to make the capture.
And finally, beginning with Safari v.10.0.2, each time you call up an app via the Bookmarklet, you will be asked to Allow the
Bookmarklet to open the app. This is another restriction that Apple has in place and there is no way around it. Interestingly,
while Google Chrome and FireFox browsers will ask the same question, both have an option to remember your choice and when checked
you will only need to allow the Bookmarklet once on those browsers.